
Hello
everyone
It’s
Anguree on the blog today and I am very excited to share how I created my take
on the challenge this month. I absolutely loved this process and you will be amazed how
quickly it all came together. So even though it may seem like a very long
process, it did not actually take that long at all. So go grab a cuppa and sit back to
see how I've done it.

First you will need a 12. 12 inch sheet of
kraft cardstock.

Lay down a stencil ( I used Crafter’s Workshop)
on the top left of the page and add
white texture paste or modelling paste to your paper. Dry with a heat gun.


Repeat step 2 by adding another stencilled shape
towards the right side of the paper, but position it more towards the middle of
the paper. Dry with a heat gun.
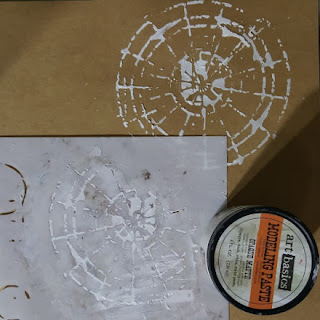

Use another stencil and add more texture using
coloured paste. I used Colourblast texture paste (Leather) and loved it, but
you could also mix some mica powder into 3D gel or impasto if you don’t owe
Colourblast texture paste. (Position the stencil to both fill and overlap the
gap between the other 2 stencilled shapes. Add more texture past to the bottom left and
middle right side of the stencilled shapes.


Position your photo over the stencilled
background to get an idea of where it will be placed.

Cut strips of grip-tape and start adding them to
the background paper, as shown in the photo.
Test the positioning of the grip tape against
your photo placement.


Cut some cardboard shapes using a Tim Holts die. (I used the arrows).

Choose a title for your layout. I chose this
stunning Adventure chipboard by Srap FX Australia.

Now for some stamping. I used this large
compass stamp which I have bought a few years ago. Compass stamps/die cuts have
been very popular, so you could use any similar ones you may owe. Use Brown
Archival ink and add 2 stamps to the background as shown in the photo.


Use smaller but similar compass stamp and the brown
Archival ink to stamp 6 images on a scrap piece of white card stock.
Fussy-cut or punch 3 of these images in the
exact size as the stamp. ( I just used a large circle Punch)
Repeat step 14, but this time cut 3 smaller
circles. (I just used a medium circle punch)
Use some mounting foam and layer the smaller
circles on top of the larger circles
Stamp aeroplane shapes using embossing liquid
and emboss with white embossing powder.
Fussy-cut the planes and use mounting foam to
layer the planes on top of the smaller circles.

Adhere some white string to your background and
shape it to form little hoops or balloon shapes, using adhesive of your choice.
Add more texture to the background using white
Archival ink and a grid stamp.

Look through some paper scraps or paper pads you
may have and choose a suitable piece of paper for mounting your photo. As you
will note, I only used 2 tiny strips.
Search for another piece of coordinating
card stock and cut a tag shape using one of the dies you may have in your stash.
(If you don’t have any, you can very easily create your own little tag shape)

Position your photo and paper strips and then
add the tag under the photo. Adhere all the pieces to the background.
Paint your cardboard arrows with white gesso.
Ink your title with Archival ink
Add embossing liquid and emboss with Tinby
Design Melts or your choice of embossing powder.

Add some highlights to the embossed title using
gliders paste or rub-on wax or paint.
Add some embossing liquid to your background. I
used Stampedous and used the dabber end, but then took the top off and flicked
some liquid onto the paper using a paintbrush.
Add some Stampendous white embossing powder
randomly over the embossing liquid and emboss with a heat gun.
Position the arrows and circle and plane embellishments
onto the background and adhere using adhesive of your choice.
Add some journalling using Tim Holtz phrases and
mounting foam. You could also type and print or write your own.
Yeah you are done. J I hope you enjoyed this and would
really love to see your take on the challenge and or any layout you do, using
the above techniques, so please don’t be shy to share your creations with us.
Comment below for a prize!!!
(Australian residents only)
Comment below for a prize!!!
(Australian residents only)


